Rivermax! とりあえず動かして見ました Part-1 導入編

Nvidia/Mellanox社製Rivermaxソフトウェアを、Ubuntu20.04へインストールして動かしてみました。
インストール編とデモ構築編の2部構成で紹介します。
Part-1:インストール編では、購入したライセンスのRivermaxへの導入方法、Ubuntu20.04へのインストールをご紹介します。
Part-2:デモ構築編では、デモに必要なサンプルファイルのダウンロード、アプリ等のインストール、デモの実行をご紹介します。
1 Rivermaxのインストール準備
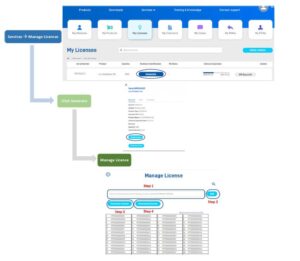
1.1 ライセンスの有効化(ライセンスファイルの生成)
Rivermaxのライセンスは、所定の購入手続きを経ライセンスを入手した後、MyMellanoxへログインして、ライセンスと使用する
NIC(ConnectX)のシリアルを関連付けしたライセンスファイルを生成する必要があります。
My Mellanoxサイト:https://support.mellanox.com/s/

My Licensesタブに入手したライセンスが掲載されているので、それを選択し、登録するNICのモデル名、
シリアル番号を入力して、「Generate」すると以下のように
ライセンスファイル「rivermax-xxxxxxx-qtyX-xxxxxx.li」が生成されダウンロードできるようになる。
【例】 rivermax-①07062020-②qty12-③9349150.lic
①License生成日 ②登録NICの数量 ③ライセンスレコードSN
※登録したNICが故障するなどした場合には、MY Mellanoxサイトでは登録変更はできませんので、
Nvidia/Mellanoxサポートに再度ライセンスを発行申請してください。
詳細は、NVIDIA® Mellanox® RIVERMAX® License Generation Procedure v1.0をご参照ください。
1.2 Rivermaxサポートプラットフォーム

1.3 Rivermaxソフトウェア、サンプル動画のダウンロード
1.3.1 Rivermaxソフトウェア、サンプル動画、各種マニュアル
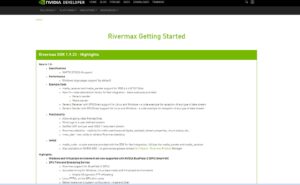
Rivermaxソフトウェア、サンプル動画、マニュアル等はNVIDIAデベロッパーサイトからダウンロードする
※ライセンスを入手するタイミングで登録したメールアドレスにサイトのURLが送られてきて、アカウントを作成
https://developer.nvidia.com/networking/rivermax-getting-started
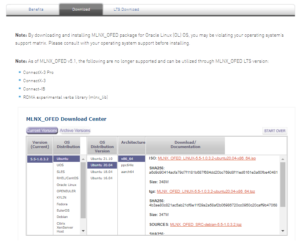
1.3.2 Rivermaxソフトウェアのダウンロード
Rivermaxソフトウェア、サンプル動画のダウンロード(2022年2月1日現在)
「Downloads」の
□I agree To Terms of the NVIDIA Rivermax Software License Agreementに、☑をいれると
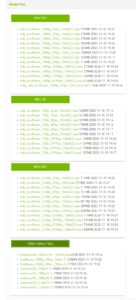
以下のダウンロードメニューが表示されるので、OSに合わせたRivermaxソフトウェアパッケージ、
サンプル動画など必要なソフトウェアをダウンロードする。
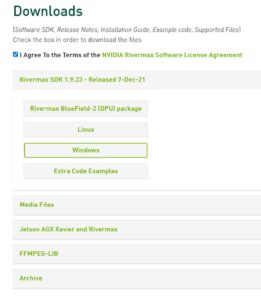
OS を選択してクリックすると、詳細が表示される
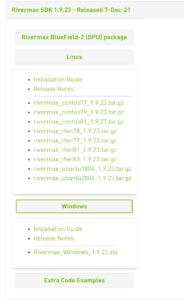
InstallationGuide、ReleaseNoteは、
ここからダウンロードする。
1.3.3 Rivermax サンプル動画のダウンロード
Media Filesを選択すると、様々なサンプル動画をダウンロードできる
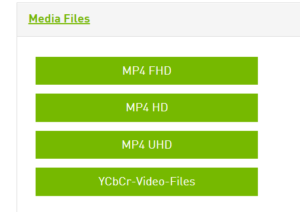
今回のデモでは、mellanoxTV_1080p50.ycbcrとSeaWaves_1080p_50fps_10bits.ycbcrを使います。
1.3.4 マニュアル類のダウンロード
以下から必要なマニュアルをダウンロードする
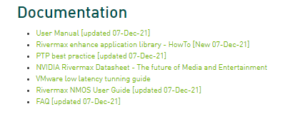
【Rivemaxソフトウェアの仕様やMedia_Liblaryの詳細は、以下のドキュメントをご参照ください。】
NVIDIA Rivermax Media Library User Manual v9.0
NVIDIA Rivermax Media Library Installation Guide
NVIDIA Rivermax Media Library Release Notes
1.4 NIC用のドライバ
Ubuntu20.04へOFEDドライバをインストールします。V1.9.23(2022年2月最新)の場合、
サポートされているUbuntu用ドライバは
MLNX-OFED: 5.5-1.0.3.2 [Ethernet only]以降、もしくは
ENモデル用のMLNX_EN 5.5-1.0.3.2 以降になります。
※ENモデルでもOFEDドライバで動作可能です。今回は同じサーバにVPIのカードも搭載されているの
でOFEDドライバを使用しました。
1.4.1 OFEDドライバのダウンロード
(1)ドライバはNvidia/Mellanoxのサイトよりダウンロードできます。
https://developer.nvidia.com/networking/ethernet-software
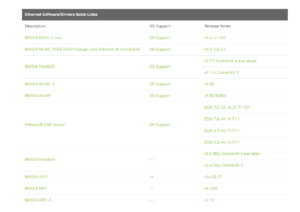
(2)OS, Distribution, Architectを選択して、表示された
MLNX_OFED_LINUX-5.5-1.0.3.2-ubuntu20.04-x86_64.tgz
をクリックしてダウンロードする。
※本書では、isoファイルではなく、tgzファイルでのインストールを説明します。
1.4.2 NICドライバのインストール Ubuntu20.04
ダウンロードしたドライバを展開し、生成されたドライバディレクトリで以下のコマンドを実行します。
◆OFEDドライバの場合
$ sudo ./mlnxofedinstall –vma –force-fw-update –force
◆ENドライバの場合
$ sudo ./install –vma –force-fw-update –force
1.5 Rivermaxソフトウェア
1.5.1 Rivermaxソフトウェアパッケージ Ubuntu20.04
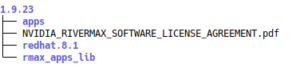
ダウンロードしたRivermaxソフトウェアパッケージを展開すると以下のような構成になってます。
1.5.2 Rivermaxソフトウェアパッケージのインストール Ubuntu20.04
dpkgコマンドにてRivermaxパッケージをインストールします。
#dpkg-i ./1.9.23/Ubuntu.20.04/deb-dist/x86_64/ rivermax_12.2.10.23_amd64.deb
各種、ソフトウェアが配下のディレクトリに展開されます。
◆確認 dpkg -Lコマンドで、Rivermaxが正常にインストールされたか確認できます。
root@G4-57 $ dpkg -L rivermax
/.
/debian
/debian/rivermax
/debian/rivermax/usr
/debian/rivermax/usr/lib
/debian/rivermax/usr/lib/x86_64-linux-gnu
/debian/rivermax/usr/lib/x86_64-linux-gnu/librivermax.a
/debian/rivermax/usr/lib/x86_64-linux-gnu/librivermax.so.0.0.0
/usr
/usr/include
/usr/include/mellanox
/usr/include/mellanox/rivermax_api.h
/usr/lib
/usr/lib/x86_64-linux-gnu
/usr/lib/x86_64-linux-gnu/librivermax.a
/usr/lib/x86_64-linux-gnu/librivermax.la
/usr/lib/x86_64-linux-gnu/librivermax.so.0.0.0
/usr/share
/usr/share/doc
/usr/share/doc/rivermax
/usr/share/doc/rivermax/changelog.gz
/usr/share/doc/rivermax/copyright
/debian/rivermax/usr/lib/x86_64-linux-gnu/librivermax.so
/debian/rivermax/usr/lib/x86_64-linux-gnu/librivermax.so.0
/usr/lib/x86_64-linux-gnu/librivermax.so
/usr/lib/x86_64-linux-gnu/librivermax.so.0
1.5.3 デモ用のアプリケーションの構築
Rivermaxをインストールして生成された、/1.9.23/appsフォルダ内にあるデモ用のアプリケーションを構築
します。今回、検証したUbuntu20.04はインストールしたばかりであることから、各アプリケーションの構築を
するためにはツールが不足していたので、本手順では都度、必要なツールをダウンロードしてインストールして
おります。
1.5.3.1 C++をインストールします
#sudo apt install build-essential
#sudo apt install clang
#sudo apt install libboost-all-dev
1.5.3.2 appsフォルダ内のビルド
/1.9.23/appsフォルダへ移動して、“make”を実行します。
root@G4-58 # make
g++ -o media_sender.o -std=c++11 -I/usr/include/mellanox/ -I. -O3 -c media_sender.cpp
g++ -o media_sender media_sender.o rt_threads.o -lrivermax -pthread
g++ -o generic_receiver.o -std=c++11 -I/usr/include/mellanox/ -I. -O3 -c generic_receiver.cpp
g++ -o generic_receiver generic_receiver.o rt_threads.o -lrivermax -pthread
g++ -o generic_sender.o -std=c++11 -I/usr/include/mellanox/ -I. -O3 -c generic_sender.cpp
g++ -o generic_sender generic_sender.o rt_threads.o -lrivermax -pthread
root@G4-58 # ls
CLI generic_sender.cpp media_sender.o
Makefile generic_sender.h readerwriterqueue
checksum_header.h generic_sender.o rivermax_player.cpp
cuda gpu.cpp rt_threads.cpp
defs.h gpu.h rt_threads.h
ffmpeg_setup.sh media_node rt_threads.o
fifo.h media_receiver sdps_samples
generic_receiver media_receiver.cpp tx_hello_world
generic_receiver.cpp media_receiver.o viewer.cpp
generic_receiver.o media_sender viewer.h
generic_sender media_sender.cpp
1.5.3.3 media_reciverのアプリケーションの構築
RivermaxはSender側で動画/音声を送信して、Reciver側でそれを受信します。
受信した際に、それをGUIで表示するためには、Viwereが必要になりますので
reciver(media_reciver)のmake時にVIERER=yのオプションが必須となるので注意してください。
root@G4-58 # make mdedia_receiver VIEWER=y
g++ -o viewer.o -std=c++11 -I/usr/include/mellanox/ -I. -O3 -DALLOW_OPENGL -c viewer.cpp
g++ -o media_receiver media_receiver.o rt_threads.o viewer.o -lglut -lGL -lrivermax -pthread
root@G4-58 # ls
root@G4-58 # ls
CLI generic_receiver.o media_receiver.cpp rt_threads.o
Makefile generic_sender media_receiver.o sdps_samples
checksum_header.h generic_sender.cpp media_sender tx_hello_world
cuda generic_sender.h media_sender.cpp viewer.cpp
defs.h generic_sender.o media_sender.o viewer.h
ffmpeg_setup.sh gpu.cpp readerwriterqueue viewer.o
fifo.h gpu.h rivermax_player.cpp
generic_receiver media_node rt_threads.cpp
generic_receiver.cpp media_receiver rt_threads.h
Makefile:71: *** “Please install FreeGlut for VIEWER mode”. Stop.
※makeを実行すると、上記のようなエラーが出た場合、Makeするためには、“FreeGlut”というOpenGL
が必要です。
1.5.3.4 FreeGlutのインストール
$ sudo apt update
$ sudo apt upgrade
$ sudo apt-get install libglu1-mesa-dev mesa-common-dev freeglut3-dev
※”freeglut3″や”libgl1-mesa-dev”も必要で、これらは依存関係で一緒にインストールされる
1.5.3.5 nsam ysamのインストール
root@G4-58 # sudo apt-get install nasm yasm
root@G4-58 # ls
CLI generic_receiver.o media_receiver.cpp rt_threads.o
Makefile generic_sender media_receiver.o sdps_samples
checksum_header.h generic_sender.cpp media_sender tx_hello_world
cuda generic_sender.h media_sender.cpp viewer.cpp
defs.h generic_sender.o media_sender.o viewer.h
ffmpeg_setup.sh gpu.cpp readerwriterqueue viewer.o
fifo.h gpu.h rivermax_player.cpp
generic_receiver media_node rt_threads.cpp
generic_receiver.cpp media_receiver rt_threads.h
1.5.3.6 ffmpegアプリケーションのインストール
ffmpegアプリケーションをインストールするには、gitツールが必要になります。
root@G4-58 # sudo apt-get install git
パッケージリストを読み込んでいます… 完了
依存関係ツリーを作成しています
状態情報を読み取っています… 完了
ffmpegをインストールします。
root@G4-58 # ./ffmpeg_setup.sh
Cloning into ‘ffmpeg’…
remote: Enumerating objects: 475679, done.
remote: Counting objects: 100% (475679/475679), done.
remote: Compressing objects: 100% (99580/99580), done.
remote: Total 475679 (delta 377154), reused 471899 (delta 375397)
Receiving objects: 100% (475679/475679), 116.49 MiB | 1.33 MiB/s, done.
Resolving deltas: 100% (377154/377154), done.
Note: switching to ‘289a79d545e83a97f5cdd00b28ce70638dae53e8’
root@G4-58 # ls
CLI generic_receiver.cpp media_receiver rt_threads.h
Makefile generic_receiver.o media_receiver.cpp rt_threads.o
checksum_header.h generic_sender media_receiver.o sdps_samples
cuda generic_sender.cpp media_sender tx_hello_world
defs.h generic_sender.h media_sender.cpp viewer.cpp
ffmpeg generic_sender.o media_sender.o viewer.h
ffmpeg_setup.sh gpu.cpp readerwriterqueue viewer.o
fifo.h gpu.h rivermax_player.cpp
generic_receiver media_node rt_threads.cpp
1.5.3.7 rivermax _playerのインストール
root@G4-58 # make rivermax_player
g++ -o rivermax_player.o -std=c++11 -I/usr/include/mellanox/ -I. -I./ffmpeg/include -I./readerwriterqueue -O3 -c rivermax_player.cpp
root@G4-58 # ls
CLI generic_receiver.cpp media_receiver rivermax_player.o
Makefile generic_receiver.o media_receiver.cpp rt_threads.cpp
checksum_header.h generic_sender media_receiver.o rt_threads.h
cuda generic_sender.cpp media_sender rt_threads.o
defs.h generic_sender.h media_sender.cpp sdps_samples
ffmpeg generic_sender.o media_sender.o tx_hello_world
ffmpeg_setup.sh gpu.cpp readerwriterqueue viewer.cpp
fifo.h gpu.h rivermax_player viewer.h
generic_receiver media_node rivermax_player.cpp viewer.o
1.5.3.8 Rivermax のアプリケーション ライブラリの構築
/1.9.23/ /rmax_apps_libへ移動して、以下の順番でコマンドを実行して、Rivermaxアプリケーション
ライブラリを構築します。
- ./autogen.sh
- ./configure
- make
root@G4-58 # cd ../rmax_apps_lib/
root@G4-58 # ls
Makefile.am api apps autogen.sh configure.ac docs io_node lib util
root@G4-58 # ./autogen.sh
autoreconf: Entering directory `.’u
autoreconf: configure.ac: not using Gettext
autoreconf: running: aclocal
autoreconf: configure.ac: tracing
autoreconf: running: libtoolize –copy
libtoolize: putting auxiliary files in ‘.’.
libtoolize: copying file ‘./ltmain.sh’
libtoolize: Consider adding ‘AC_CONFIG_MACRO_DIRS([m4])’ to configure.ac,
libtoolize: and rerunning libtoolize and aclocal.
libtoolize: Consider adding ‘-I m4’ to ACLOCAL_AMFLAGS in Makefile.am.
autoreconf: running: /usr/bin/autoconf
autoreconf: running: /usr/bin/autoheader
autoreconf: running: automake –add-missing –copy –no-force
configure.ac:141: installing ‘./compile’
configure.ac:143: installing ‘./config.guess’
configure.ac:143: installing ‘./config.sub’
configure.ac:123: installing ‘./install-sh’
configure.ac:123: installing ‘./missing’
apps/Makefile.am: installing ‘./depcomp’
autoreconf: Leaving directory
root@G4-58 # ls
Makefile.am api compile config.h.in configure.ac install-sh
ltmain.sh Makefile.in apps config config.sub depcomp io_node missing
aclocal.m4 autogen.sh config.guessconfigure docs lib util
root@G4-58 # ./configure
root@G4-58 # ls
Makefile api config config.log configure.ac io_node missing
Makefile.am apps config.guess config.status depcomp lib stamp-h1
Makefile.in autogen.sh config.h config.sub docs libtool util
aclocal.m4 compile config.h.in configure install-sh ltmain.sh
root@G4-58 # make
make all-recursive
make[1]: Entering directory ‘/home/Mellanox/Rivermax/1.9.23/rmax_apps_lib’
Making all in lib
make[2]: Entering directory ‘/home/Mellanox/Rivermax/1.9.23/rmax_apps_lib/lib’
CXX services/error_handling/librmaxapps_la-signal_handler.lo
CXX services/cli/librmaxapps_la-cli_manager.lo
CXX services/cli/librmaxapps_la-validators.lo
これで、Rivermaxのインストールと一通りのアプリケーションのインストールが終了しました。
1.5.4 ライセンスファイルの導入
インストールしたRivermaxを動作させるためには、1.1で生成したライセンスファイルを以下のディレクトリに
rivermax.licというファイル名で保存する必要があります。
フォルダはRivermaxがインストール終了しても作成されませんので作ります。
root@G4-58 # cd /opt/mellanox
root@G4-58 # mkdir rivermax
root@G4-58 # ls
ethtool iproute2 mlnx-fw-updater rivermax
root@G4-58 # cd rivermax/
root@G4-58 # ls
rivermax-19012022-qty2-9177990.lic
root@G4-58 # cp rivermax-19012022-qty2-9177990.lic rivermax.lic
root@G4-58 # ls
rivermax-19012022-qty2-9177990.lic rivermax.lic
1.5.5 Rivermaxの動作確認とライセンスファイルの確認
Rivermaxを動かして、動作を確認し、ログから搭載されているNICとライセンスが正常に連携され問題ないこと
を確認します。
【手順】
- Rivermax media_senderを動作させる
- Logを参照して、Licenseが正常に認証されているか確認、RivermaxのPIDを確認
- rmax_stataユーティリティで、2で確認したPIDを使って動作していることを確認する
1.5.5.1 sdpファイルの準備
Rivermaxのmedia_senderを実行するためには適切な設定のsdpファイルが必要になるので
/1.9.23/apps/sdps_samples配下にあるサンプルsdpファイルを環境に合わせて編集する。
root@G4-58 # cd sdps_samples/
root@G4-58 # ls
sdp_2110-20_narrow_gap_1080i25fps.txt
sdp_2110-20_narrow_gap_1080p50fps.txt
sdp_2110-20_narrow_gap_2160p50fps.txt
sdp_2110-22_tpnl_1080i25fps.txt
sdp_2110-30_1000us_48khz_2ch.txt
sdp_2110-30_125ms_96khz_2ch.txt
sdp_2110-31_1000us_48khz_2ch.txt
sdp_2110-40.txt
sdp_multi_2110_20-30-40.txt
sdp_2022-6_50fps.txt sdp_multi_2110_20-30-40_narrow_gap_1080p59_125ms_anc.txt
sdp_2022-7_25fps.txt sdp_multi_2110_20-30.txt
sdp_2022-8_50fps.txt
※今回はsdp_2110-20_narrow_gap_1080p50fps.txt を編集するのでコピーを作成
SenderのIPアドレスを使用するNICのIPアドレスに修正
※以下の例はG4-58サーバ 192.168.240.58
root@G4-57 #cp sdp_2110-20_narrow_gap_1080p50fps.txt fumi.txt
root@G4-57 # vi fumi.txt
v=0
o=- 1443716955 1443716955 IN IP4 192.168.240.57 <=<MCX512A-ACAT MT1937K04358>
s=SMPTE ST2110-20 narrow gap 1080p50
t=0 0
m=video 2000 RTP/AVP 96
c=IN IP4 224.0.0.1/64
a=source-filter: incl IN IP4 224.0.0.1 192.168.240.57 <=<MCX512A-ACAT MT1937K04358>
a=rtpmap:96 raw/90000
a=fmtp:96 sampling=YCbCr-4:2:2; width=1920; height=1080; exactframerate=50;
depth=10; TCS=SDR; colorimetry=BT709; PM=2110GPM; SSN=ST2110-20:2017; TP=2110TPN;
a=mediaclk:direct=0
a=ts-refclk:localmac=40-a3-6b-a0-2b-d2
1.5.5.2 media_senderの実行
rmax_stataユーティリティを動作させる場合、以下のコマンドでRivermax StatisticsをEnableにする。
root@G4-57 # export RIVERMAX_ENABLE_STATISTICS=1
root@G4-57 #
/appsディレクトリ(1つ上)にもどり、以下のコマンドを実行してmedia_senderを実行する
./media_sender -c 1 -a 2 -s ./sdps_samples/fumi.txt
root@G4-57 # ./media_sender -c 1 -a 2 -s ./sdps_samples/fumi.txt
#############################################
## Rivermax library version: 12.2.10.23
## Media sender version: 12.2.10.23
#############################################
Writing log to default location: /tmp/rivermax_0119_123930_460589.log
Created log file: /tmp/rivermax_0119_123930_460589.log
[22-01-19 12:39:30.056147] Tid: 460589 info [InitLogger:91] Logger started
[22-01-19 12:39:30.056198] Tid: 460589 info [rmax_init_version:377] starting Rivermax version 12.2.10.23
:
:
:
1.5.5.3 RivermaxのPIDの確認
正常に動作した場合、ログがずっと流れ続けるので、そのログ別ファイルにリダイレクトして、“PID”で検索するか、そのまま
スクロールして以下の部分を参照して、RivermaxのPID“で検索を確認する。
[22-01-19 12:39:30.056943] Tid: 460589 debug [rivermax_set_thread_affinity:670] successfully set thread affinity
[22-01-19 12:39:30.056987] Tid: 460589 debug [rivermax_set_thread_priority:694] set priority successfully to 99
[22-01-19 12:39:30.056994] Tid: 460589 debug [start_thread:344] Started event handler thread
[22-01-19 12:39:30.057009] Tid: 460589 debug [init_globals:191] Time now is 1642563607057009759
[22-01-19 12:39:30.057047] Tid: 460590 info [print_thread_info:117] High priority internal thread: PID = 55404, thread ID = 460590
VMA INFO: —————————————————————————
VMA INFO: VMA_VERSION: 9.4.0-1 Release built on Oct 5 2021 11:18:30
VMA INFO: Cmd Line: ./media_sender -c 1 -a 2 -s ./sdps_samples/fumi.txt
VMA INFO: OFED Version: MLNX_OFED_LINUX-5.5-1.0.3.2:
VMA INFO: —————————————————————————
VMA INFO: Log Level INFO [VMA_TRACELEVEL]
VMA INFO: Tx Mem Segs TCP 4 [VMA_TX_SEGS_TCP]
VMA INFO: Tx Mem Bufs 256 [VMA_TX_BUFS]
VMA INFO: Tx QP WRE 128 [VMA_TX_WRE]
VMA INFO: Tx Prefetch Bytes 32 [VMA_TX_PREFETCH_BYTES]
VMA INFO: Rx Mem Bufs 256 [VMA_RX_BUFS]
VMA INFO: Rx QP WRE 128 [VMA_RX_WRE]
VMA INFO: Rx Prefetch Bytes 32 [VMA_RX_PREFETCH_BYTES]
VMA INFO: Force Flowtag for MC Enabled [VMA_MC_FORCE_FLOWTAG]
1.5.5.4 Licenseの正常性の確認
PIDの確認と同様、logの中から以下の部分を確認する。
以下は、弊社「Servants International」のライセンスであり、搭載しているens2f0.1のインスタンスのNICにライセンスが
登録されていることが確認されていることになります。※以下の例はG4-58サーバ 192.168.240.58
Tid: 451215 debug [os_map_dpcp_devices:251] examining 192.168.200.58, of ens2f0 -> mlx5_0 (ens2f0)
Tid: 451215 debug [init:123] Adapter frequency (khz) 156250
Tid: 451215 debug [init:130] Reserved MKey created lkey=0x700
Tid: 451215 debug [os_map_dpcp_devices:283] added new device mlx5_0 with ip 192.168.200.58 mac 0x43f72b5c844
Tid: 451215 debug [os_map_dpcp_devices:251] examining 192.168.201.58, of ens2f1 -> mlx5_1 (ens2f1)
Tid: 451215 debug [init:130] Reserved MKey created lkey=0x700
Tid: 451215 debug [os_map_dpcp_devices:283] added new device mlx5_1 with ip 192.168.201.58 mac 0x43f72b5c845
Tid: 451215 debug [os_map_dpcp_devices:251] examining 192.168.240.58, of ens1f1 -> mlx5_3 (ens1f1)
Tid: 451215 debug [init:130] Reserved MKey created lkey=0x700
Tid: 451215 debug [os_map_dpcp_devices:283] added new device mlx5_3 with ip 192.168.240.58 mac 0xb8599fd226f7
Tid: 451215 info [license_validate_v4:446] Licensed to: SERVANTS_INTERNATIONAL_CORPORATION (N/A)
Tid: 451215 info [info_product:462] Rivermax license version: 4.1
Tid: 451215 info [license_validate:512] Rivermax license id ae10d163-cf69-b49f-61e8-ad32014c407c, revision 1
Tid: 451215 info [license_assert_device:715] Validating Rivermax license for device with local ip 192.168.240.58
Tid: 451215 info [is_sn_licensed:211] Licensed serial number: MT1937K04353
1.5.5.5 rmax_statユーティリティのでRivermaxの動作確認
2.2.5.3 で確認したPIDを使用してRivermaxの動作を確認します。
以下のようにコマンド実行後にRivermaxのステータスが継続して表示されればRivermaxは正常に動作しております。
#/1.9.23/Ubuntu.20.04/deb-dist/x86_64/rmax_stat -p 55404
No query was set, using default config 0x3f
Connected with Rivermax application PID: 55404
Rivermax version: 12.2
SSTART ProcId SessId ThrId SrcAddr:Port DstAddr:Port Streams Type VidH VidW Intlace CMAX FPS PTIME Abits AChanls Clock SSTART 55404 0 54564 1.1.63.12:49702 231.1.2.3:2000 1 2110_20 1080 1920 2 0 50.00 0.000 0 0 90000 SRUN ProcId SessId ThrId Type Chunks Strides Notifs UserCh FreeCh BusyCh SRUN 55404 0 54564 TX 14422223 230755568 0 0 744 1956 RTX ProcId SessId ThrId NumPkts NumBytes PktsWQE Dummies FreeWQE RTX 55404 0 54564 7349984 9275679808 7349984 349331 2 SRUN 55404 0 54564 TX 14462834 231405344 0 0 744 1956
rmax_statコマンドの出力が継続せずにすぐに終了(プロンプトがすぐに戻ってくる)してしまって、以下のような
メッセージが表示されている場合、Rivermaxが正常に動作していない、もしくはPIDが間違っている場合があります。
※2.2.5.3で実行したmedia_senderが継続してlogを出力している場合、Rivermaxは正常に動作してます。
そのような場合、PIDが違ってます。
# /home/Mellanox/Rivermax/1.9.23/Ubuntu.20.04/deb-dist/x86_64/rmax_stat -p 9748
No query was set, using default config 0x3f

Error: shared memory intialization with size 8388608 bytes failed

Statistics initialization failed - disabled for Rivermax, exiting..

Failed to initialize the memory required for the application

Rivermax Statistics failed to run